What is a Podcast and Why Would a DJ Create One?
A podcast is a collection of audio files stored on a website which is subscribed to using a media software (most commonly iTunes). A feed supplies the software an up to date list of the episodes available for each podcast. The software then downloads the appropriate media file for the episode which can then be listened to on a computer or transferred to a media player like an iPod or iPhone.
Creating a podcast is a great way for a proactive DJ to promote themselves. Creating a podcast gives DJ’s yet another channel to promote themselves. In this guide we will cover hosting your own website and podcast which gives you ultimate control over everything to do with your podcast and any promotion that goes along with it.
This guide will go over the creation of a podcast from start to finish including the recording, site setup and hosting, and podcast content creation and submission. We will be using WordPress to host our podcast. Read on and get your own site and podcast set up!
The Complete Podcast Setup Guide for DJ’s
Podcast Basics: Name, Logos, Music, & More
Before you get started on your podcast, you need to be able to brand the podcast and yourself as a DJ. Start by creating a name for your podcast. This might be as simple as DJ Joe’s Weekly Mix or something like a record label or crew name. You will want to make sure and distinguish yourself as the DJ. This way you can create social pages and profiles for your podcast AND your personal DJ persona. When choosing a podcast name (and even a DJ name for that matter) it is always wise to make sure you can find a URL to purchase that will represent your podcast. Finding a short, easy to type, .com is going to be your best bet. More on that later.
You will want to define the type of music you will be playing. This might be something broad like hip-hop or something more narrow like deep house. No matter what direction you want to go, just make sure you can give your listeners an idea of what they might be hearing.
Your a DJ, not a designer, so asking you to make a logo for your podcast might not make sense. This is where hiring a designer can come in handy. My suggestion is to run over to fiverr.com and you can find a logo designer and grab a podcast logo for $5. Cheap and easy.
Mix Recording: How to Record Podcast Ready Mixes
Hardware and/or Software Setup
If you are using a computer setup, pretty much any DJ software will have a built in recording feature. As long as your computer is fast enough, this will likely be the easiest solution.
If you are using a solution without a DJ software or use some sort of external mixer where your master sound output happens on your DJ mixer, then you will need an external audio recording solution. First you need to route the audio source from your mixer to your computer or recording device. This can be as simple as an RCA to 1/8″ auxiliary cable or as advanced as an external audio interface. Using an audio interface will give you the best sound quality, but cost you more.
If you are using an external mixer routed to your computer, you are going to need an audio recording program. We have a full writeup on recording your DJ mixes.
Before we get started, you will want to make sure you have an episode of your podcast recorded.
Domain, Web & Media Hosting
There are many ways to host your podcast. There is anything from free services with limited features to self hosted paid solutions. Today we are going to be looking at a self hosted solution in depth because this gives you all the control you need. This might cost you a couple bucks, but since you’re here to create a quality podcast, we are going to do things right. We will be using WordPress combined with the Powerpress plugin to power our podcast.
Domain Name
Before we head out and purchase hosting you need to find an available domain name. The keys to finding the correct domain name:
- .com is the best, .net is ok
- The shorter the better, but you don’t need to abbreviate
- You should be able to speak your domain name out loud and have someone be able to easily spell/type it.
- If the perfect name is taken, try adding dashes to the name
Head on over to Dreamhost’s domain section and search for a domain name for your podcast. You don’t need to buy it yet, just make sure you have one. We will cover what you need for web hosting below, and with our Dreamhost promo code (DDJH) you will receive a free lifetime domain name.
Web Hosting
In order to host the website, feed, and audio files for your podcast you need to invest in some web hosting. Because we are going to be serving normal web traffic AND downloads of potentially large files, we are going to be putting the bandwidth (total amount of data that can be transferred each month) as one of our top priorities when searching for a hosting plan.
We will be using WordPress to host our website so we need a hosting plan with PHP and MySql support. Pretty much any common web host will have this support, and likely they will have the ability to easily install WordPress.
We use and recommend Dreamhost for hosting. With Dreamhost you will get unlimited bandwidth and storage, plus PHP/MySQL support which is everything you need no matter how large your podcast grows to be. We offer a unique deal through Digital DJ Hub. By signing up with Dreamhost and using the promo code DDJH during checkout, you will receive a $15 discount off your hosting plan and a free lifetime domain name registration. Head on over to Dreamhost and check out their plans, for anyone without hosting, we recommend their standard shared hosting plan.
We will be using Dreamhost as our example in the coming steps. This should be similar to other web hosting solutions. We may be writing more in-depth tutorials in the future, but for now if you have any questions Google will be your best bet.
Website & Podcast Plugin Setup
Basic WordPress Setup
Great, so you signed up for web hosting and you purchased a domain name. It is time to install WordPress and get our basic site up and running. Assuming your host has a one click install you can simply set your site using that. If you don’t have a one click install option in your web panel, you can follow the quick install guide on the WordPress site.
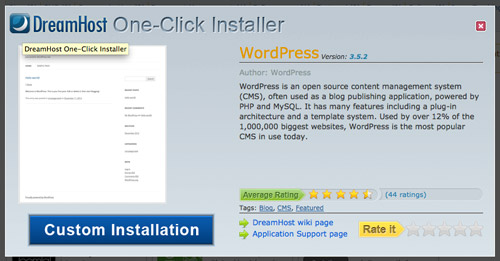
If you do have a one click install simply follow the instructions through your web hosting panel.
Once your site is installed you need to go through the basic setup and get your site set up, the basic settings set, and a theme installed. More information on the basic setup and theme settings can be found here.
Powerpress Plugin Setup & Podcast Setup
Now WordPress is known for its great blogging functionality, but with the addition of plugins it is able to do so much more. The PowerPress plugin adds all the functionality you need to turn WordPress from a blogging platform into a full fledged podcasting system.
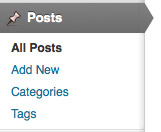
Start by heading to the plugins section of the WordPress admin which can be found at http://www.yoursite.com/wp-admin/
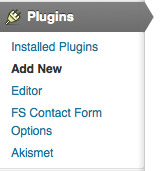
From there do a search for ‘powerpress’. You should see the plugin appear as the top result.
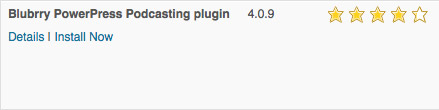
Click ‘Install Now’ and on the next page click ‘Activate Plugin’.
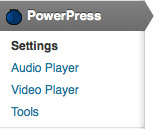
You will now have the PowerPress menu item along the left nav of your WordPress admin.
From here you need to add your first episode. Rather than go into too much detail here on the setup. Read this guide to get started with the Blubrry PowerPress settings.
Adding Your First Episode
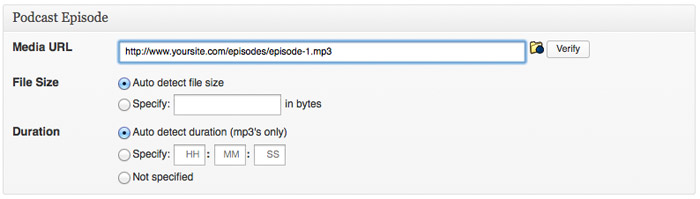
Using an FTP client or by using the FTP upload through the hosting admin, upload your podcast episode to your site. I normally make a folder under the root of my site and upload all the episodes there. IE http://www.yoursite.com/episodes/
Once you have PowerPress set up it is time to upload your first episode. Start by adding a new post from the left hand navigation in WordPress.
Name your podcast episode and provide a description. I normally add the tracklist in the description as well. Keep scrolling down and you will find a section labeled Podcast Episode. Type in the location of your uploaded podcast episode into the box and click verify.
Once you have your first episode uploaded then you have your podcast set up! You could cruise with it as is, but chances are that a good percentage of your listeners will be listening and finding you through iTunes. This means we need to get your podcast submitted to the iTunes Store. Lets go!
Podcast Submission to iTunes & Directories
Now that you have an episode uploaded, it is time to test your podcast feed and submit it to iTunes.
Testing Your Podcast
Open iTunes.
From the File menu, choose ‘Subscribe to Podcast’.
Enter your feed URL and click OK.
Make sure that iTunes adds your podcast and that you are able to download your first episode. If everything verifies and you are happy with all the settings you entered into PowerPress then you are ready to submit!
Submit to the iTunes Store
To get your podcast submitted, follow the steps outlined in the iTunes podcast submission guide. It can take a couple days for your podcast to be added to the iTunes store if approved. Be patient and check back. Once your podcast gets accepted, make sure that you return to the PowerPress settings and add your iTunes Link.
Updating Your Podcast & Ongoing Items
Once your podcast is up and running, make sure that you keep adding episodes. It is as easy as adding a new post as outlined above.
If you have questions or comments please leave them in the comments below or contact us.


Leave a Reply
You must be logged in to post a comment.